- Introduction
- Connect apu2c4 to your PC via serial connection
- Update BIOS
- Install OpenBSD
- Install vim and fix pseudo graphics
- Update OpenBSD
- Configure OpenBSD as a router
- Configure automatic time synchronization
- Add packages
- Search for packages
- Install and configure ddclient
Introduction
This is a tutorial on setting up PC Engines apu2c4 as a home router using OpenBSD. I don’t plan to use wireless card and antennas with my apu2c4. I will reuse an old OnHub router as wireless AP.
Those notes are mostly for myself, in case if I need to do this again.
Connect apu2c4 to your PC via serial connection
I use a cheap Trendnet USB to serial cable and a serial null-modem cable. Null modem cable should have a female DB-9 connector on both ends. Pin 2 goes to pin 3 on the other side.
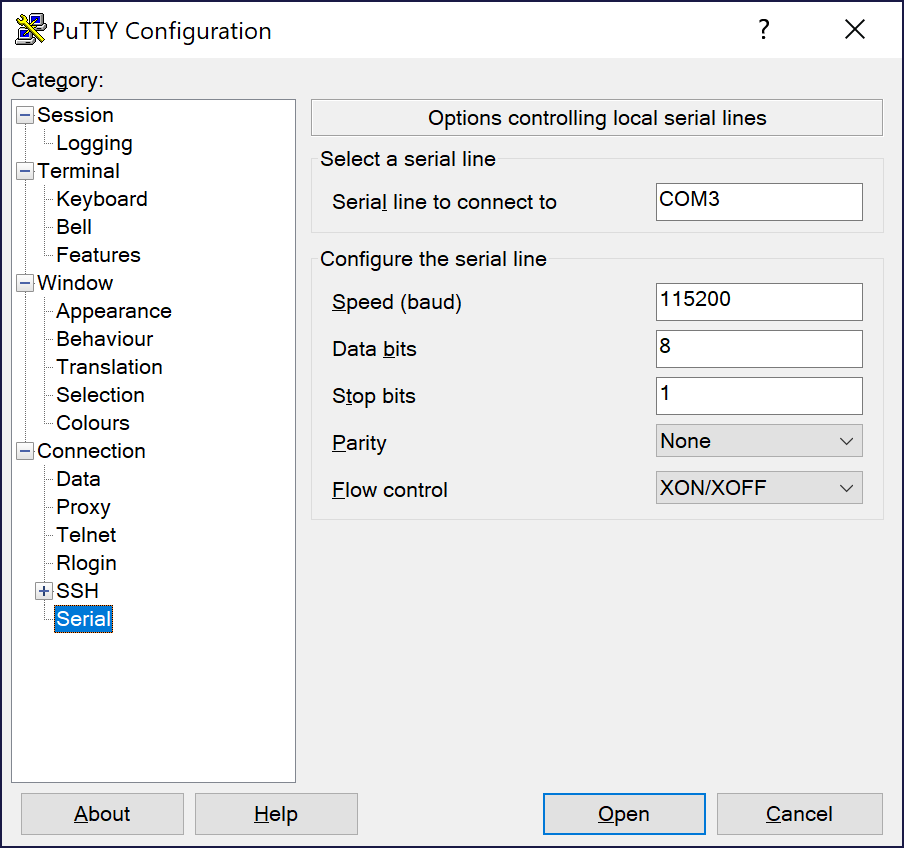
Install PuTTY, configure it for the COM port you use as 115200 8N1.
Turn apu2c4 system on by plugging in the power supply. You should see a bunch of output in PuTTY, first from BIOS and then from whatever OS is currently installed:
PC Engines apu2
coreboot build 20170831
BIOS version v4.0.12
4080 MB ECC DRAM

SeaBIOS (version rel-1.10.2.1)

Press F10 key now for boot menu
C o n s o l e s :   i n t e r n a l   v i d e o / k e y b o a r d
s e r i a l   p o r t       Disk...
 /bboooott//ccoonnffiigg::  --SS111155220000  --DD
B I O S   d r i v e   C :   i s   d i s k 0 0
 \
B I O S   6 3 8 k B / 3 6 6 8 6 6 4 k B   a v a i l a b l e
m e m o r y y
Update BIOS
Grab the latest mainline BIOS release from https://pcengines.github.io/. At the time of writting it’s v4.9.0.3.
If you are a Windows user, grab “TinyCore USB installer v1.8” from here.
Get a USB stick. I am using an old 2GB USB stick formatted as FAT32. Run downloaded “apu-bootable-usb-installer_v1.8.exe”, elevate permissions, accept license, select your USB stick and click on the check box saying “…format drive…”.
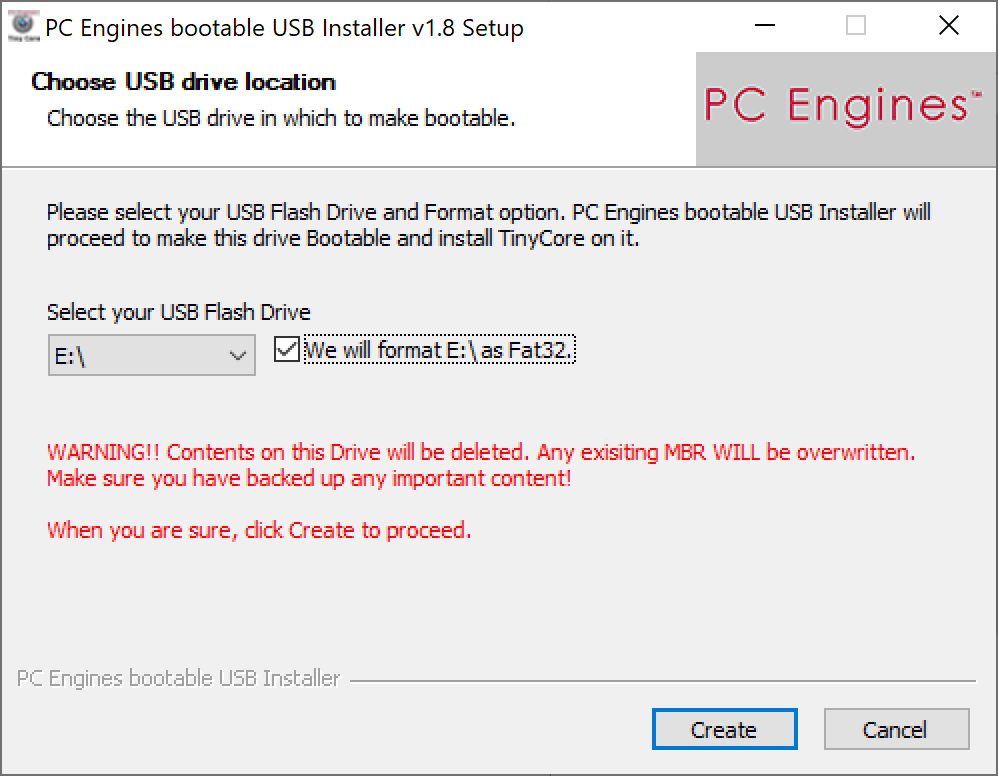
Click “Next”, then “Finish”.
Copy BIOS file to the stick. If you check the USB stick, you’ll see the following files on it:
E:\>dir
 Volume in drive E is TINYCORE
 Volume Serial Number is 4CD0-998B

 Directory of E:\

09/02/2016  11:55 AM             1,500 syslinux.cfg
08/02/2017  05:29 AM        19,839,127 core.gz
07/15/2016  10:30 AM               394 Readme.txt
07/15/2016  10:30 AM            18,339 Copying
07/20/2016  05:31 AM         4,103,744 vmlinuz
07/15/2016  10:30 AM            26,140 memdisk
03/03/2016  09:58 PM            26,568 menu.c32
03/03/2016  09:58 PM            25,204 chain.c32
07/15/2016  10:30 AM            24,148 libutil.c32
07/15/2016  10:30 AM           306,411 ipxe.krn
07/15/2016  10:30 AM               233 takemehome.txt
05/15/2017  03:38 AM               156 autostart.sh
03/11/2019  10:29 PM         8,388,608 apu2_v4.9.0.3.rom
              13 File(s)     32,760,572 bytes
               0 Dir(s)   1,984,458,752 bytes free
Eject the stick, plug it in apu2c4 and unplug/replug apu2c4 power supply. PuTTY should print out something like this:
PC Engines apu2
coreboot build 20170831
BIOS version v4.0.12
4080 MB ECC DRAM

SeaBIOS (version rel-1.10.2.1)

Press F10 key now for boot menu
Press F10, next you’ll see:
Select boot device:

1. USB MSC Drive Forza Motorsport 3 8.02
2. ata0-0: Samsung SSD 850 EVO mSATA 120GB ATA-9 Hard-Disk (11
3. Payload [memtest]
4. Payload [setup]
Press 1. This will take you to TinyCore shell prompt:
Booting Core 6.4
Running Linux Kernel 4.2.9-tinycore.
Checking boot options... Done.
Starting udev daemon for hotplug support... Done.
Skipping compressed swap in ram as requested from the boot command line.
Scanning hard disk partitions to create /etc/fstab
Setting Language to C Done.
Ignoring swap partition(s) seek as requested.
Loading extensions... Done.
Setting keymap to us Done.
Skipping DHCP broadcast/network detection as requested on boot commandline.
Setting hostname to box Done.

  ____   ____   _____             _
 |  _ \ / ___| | ____|_ __   __ _(_)_ __   ___  ___
 | |_) | |     |  _| | '_ \ / _` | | '_ \ / _ \/ __|
 |  __/| |___  | |___| | | | (_| | | | | |  __/\__ \
 |_|    \____| |_____|_| |_|\__, |_|_| |_|\___||___/
                            |___/

TinyCore 6.4 www.tinycorelinux.com

login[647]: root login on 'ttyS0'
waiting for USB being mounted .sd 4:0:0:0: [sdb] No Caching mode page found
.

Welcome to TinyCore running on PC Engines apu boards
To update the BIOS type "flashrom -w apu_xyz.rom -p internal"

[+46.9 C][root@box:/media/TINYCORE]$
Next, type in flashrom -w bios-file-name -p internal and press enter:
[+45.1 C][root@box:/media/TINYCORE]$ flashrom -w apu2_v4.9.0.3.rom -p internal
flashrom v0.9.9-r1954-beead91-17 on Linux 4.2.9-tinycore (i686)
flashrom is free software, get the source code at https://flashrom.org

Using default programmer "internal" with arguments "".
Error accessing high tables, 0x100000 bytes at 0xdffae000
/dev/mem mmap failed: Resource temporarily unavailable
Failed getting access to coreboot high tables.
Found chipset "AMD FCH".
Enabling flash write... OK.
Identifying board "PC Engines apu2"... OK.
Found Winbond flash chip "W25Q64.V" (8192 kB, SPI) mapped at physical address 0xff800000.
Reading old flash chip contents... done.
Erasing and writing flash chip... Erase/write done.
Verifying flash... VERIFIED.
Next, unplug USB stick, type reboot and press enter. apu2c4 will restart. You should see something like this:
PC Engines apu2
coreboot build 20190803
BIOS version v4.9.0.3
4080 MB ECC DRAM
SeaBIOS (version rel-1.12.0.1-0-g393dc9c)

Press F10 key now for boot menu
BIOS update is done!
Install OpenBSD
Go to http://www.openbsd.org/faq/faq4.html#Download and download installXX.fs for amd64.
At the time of writting it’s install64.fs. 64 is for OpenBSD 6.4, not for CPU type.
Now grab the tool to write fs file to USB stick: win32diskimager.
At this time, latest version is in Win32DiskImager-1.0.0-binary.zip file. Extract it and run Win32DiskImager.exe. Elevate permissions.
Browse for install64.fs file. Plug your USB stick and pick it under Device:
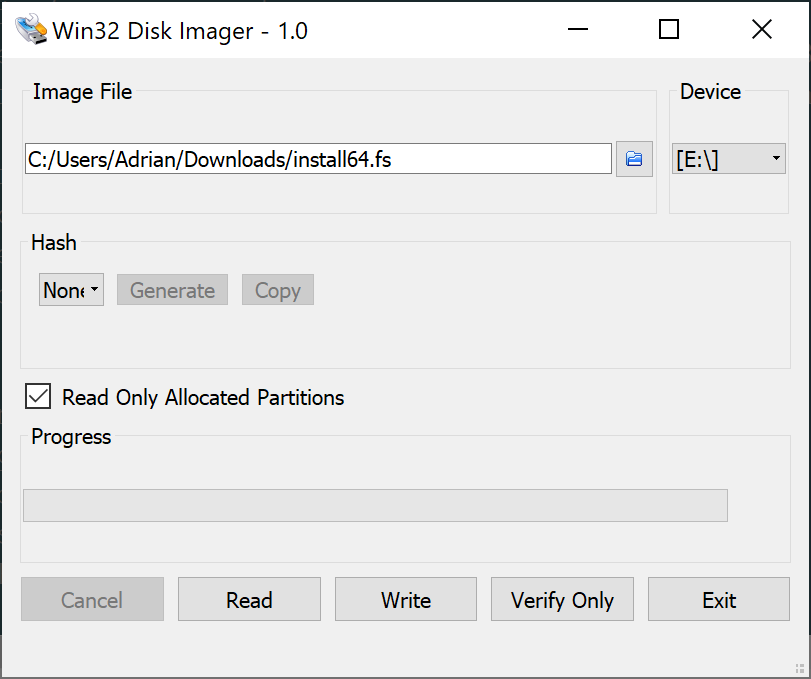
Click Write, you’ll get Confirm Overwrite popup dialog. Click Yes.
After the tool is done writing, you’ll get a Complete: Write Successful dialog. Click OK.
Windows will also ask you to format your USB stick, since it doesn’t recognize OpenBSD file system. Don’t do it.
Now eject the USB stick from your Windows PC and plug it in apu2c4.
Connect apu2c4 to your LAN using ethernet port closest to serial port (em0 in OpenBSD). This will make installation easier.
Unplug/replug apu2c4 power supply. Press F10 when BIOS prompts you to and then press 1 to boot from USB stick.
PC Engines apu2
coreboot build 20190803
BIOS version v4.9.0.3
4080 MB ECC DRAM
SeaBIOS (version rel-1.12.0.1-0-g393dc9c)

Press F10 key now for boot menu

Select boot device:

1. USB MSC Drive Forza Motorsport 3 8.02
2. AHCI/0: Samsung SSD 850 EVO mSATA 120GB ATA-9 Hard-Disk (111 GiBytes)
3. Payload [setup]
4. Payload [memtest]

Booting from Hard Disk...
Using drive 0, partition 3.
Loading.....
probing: pc0 com0 com1 com2 com3 mem[639K 3325M 752M a20=on]
disk: hd0+ hd1+*
>> OpenBSD/amd64 BOOT 3.41
boot>
In boot> prompt: type stty com0 115200 and press enter.
Then type set tty com0 and press enter twice.
This will boot OpenBSD from USB stick.
boot> stty com0 115200
boot> set tty com0
switching console to com>> OpenBSD/amd64 BOOT 3.41
boot>
0
cannot open hd0a:/etc/random.seed: No such file or directory
booting hd0a:/6.4/amd64/bsd.rd: 3511114+1500160+3892040+0+598016 [372715+111+441072+293323]=0xa208a0
entry point at 0x1000158
Copyright (c) 1982, 1986, 1989, 1991, 1993
        The Regents of the University of California.  All rights reserved.
Copyright (c) 1995-2018 OpenBSD. All rights reserved.  https://www.OpenBSD.org

OpenBSD 6.4 (RAMDISK_CD) #348: Thu Oct 11 13:36:16 MDT 2018
    deraadt@amd64.openbsd.org:/usr/src/sys/arch/amd64/compile/RAMDISK_CD
real mem = 4259921920 (4062MB)
avail mem = 4127031296 (3935MB)
mainbus0 at root
bios0 at mainbus0: SMBIOS rev. 2.7 @ 0xcfe97020 (9 entries)
bios0: vendor coreboot version "v4.9.0.3" date 03/08/2019
bios0: PC Engines apu2
acpi0 at bios0: rev 2
acpi0: tables DSDT FACP SSDT TPM2 APIC HEST IVRS SSDT SSDT HPET
acpimadt0 at acpi0 addr 0xfee00000: PC-AT compat
cpu0 at mainbus0: apid 0 (boot processor)
cpu0: AMD GX-412TC SOC, 998.26 MHz, 16-30-01
cpu0: FPU,VME,DE,PSE,TSC,MSR,PAE,MCE,CX8,APIC,SEP,MTRR,PGE,MCA,CMOV,PAT,PSE36,CFLUSH,MMX,FXSR,SSE,SSE2,HTT,SSE3,PCLMUT
cpu0: 32KB 64b/line 2-way I-cache, 32KB 64b/line 8-way D-cache, 2MB 64b/line 16-way L2 cache
cpu0: ITLB 32 4KB entries fully associative, 8 4MB entries fully associative
cpu0: DTLB 40 4KB entries fully associative, 8 4MB entries fully associative
cpu0: apic clock running at 99MHz
cpu0: mwait min=64, max=64, IBE
cpu at mainbus0: not configured
cpu at mainbus0: not configured
cpu at mainbus0: not configured
ioapic0 at mainbus0: apid 4 pa 0xfec00000, version 21, 24 pins
ioapic1 at mainbus0: apid 5 pa 0xfec20000, version 21, 32 pins, remapped
acpiprt0 at acpi0: bus 0 (PCI0)
acpiprt1 at acpi0: bus -1 (PBR4)
acpiprt2 at acpi0: bus 1 (PBR5)
acpiprt3 at acpi0: bus 2 (PBR6)
acpiprt4 at acpi0: bus 3 (PBR7)
acpiprt5 at acpi0: bus -1 (PBR8)
acpicpu at acpi0 not configured
"PNP0C0C" at acpi0 not configured
"PNP0B00" at acpi0 not configured
"BOOT0000" at acpi0 not configured
pci0 at mainbus0 bus 0
pchb0 at pci0 dev 0 function 0 "AMD AMD64 16h Root Complex" rev 0x00
vendor "AMD", unknown product 0x1567 (class system subclass IOMMU, rev 0x00) at pci0 dev 0 function 2 not configured
pchb1 at pci0 dev 2 function 0 "AMD AMD64 16h Host" rev 0x00
ppb0 at pci0 dev 2 function 2 "AMD AMD64 16h PCIE" rev 0x00: msi
pci1 at ppb0 bus 1
em0 at pci1 dev 0 function 0 "Intel I210" rev 0x03: msi, address 00:0d:b9:42:e4:b8
ppb1 at pci0 dev 2 function 3 "AMD AMD64 16h PCIE" rev 0x00: msi
pci2 at ppb1 bus 2
em1 at pci2 dev 0 function 0 "Intel I210" rev 0x03: msi, address 00:0d:b9:42:e4:b9
ppb2 at pci0 dev 2 function 4 "AMD AMD64 16h PCIE" rev 0x00: msi
pci3 at ppb2 bus 3
em2 at pci3 dev 0 function 0 "Intel I210" rev 0x03: msi, address 00:0d:b9:42:e4:ba
"AMD Cryptographic Co-processor v3" rev 0x00 at pci0 dev 8 function 0 not configured
xhci0 at pci0 dev 16 function 0 "AMD Bolton xHCI" rev 0x11: msi, xHCI 1.0
usb0 at xhci0: USB revision 3.0
uhub0 at usb0 configuration 1 interface 0 "AMD xHCI root hub" rev 3.00/1.00 addr 1
ahci0 at pci0 dev 17 function 0 "AMD Hudson-2 SATA" rev 0x39: msi, AHCI 1.3
ahci0: port 0: 6.0Gb/s
scsibus0 at ahci0: 32 targets
sd0 at scsibus0 targ 0 lun 0: <ATA, Samsung SSD 850, EMT4> SCSI3 0/direct fixed naa.5002538d4100312d
sd0: 114473MB, 512 bytes/sector, 234441648 sectors, thin
ehci0 at pci0 dev 19 function 0 "AMD Hudson-2 USB2" rev 0x39: apic 4 int 18
usb1 at ehci0: USB revision 2.0
uhub1 at usb1 configuration 1 interface 0 "AMD EHCI root hub" rev 2.00/1.00 addr 1
"AMD Hudson-2 SMBus" rev 0x42 at pci0 dev 20 function 0 not configured
"AMD Hudson-2 LPC" rev 0x11 at pci0 dev 20 function 3 not configured
sdhc0 at pci0 dev 20 function 7 "AMD Bolton SD/MMC" rev 0x01: apic 4 int 16
sdhc0: SDHC 2.0, 50 MHz base clock
sdmmc0 at sdhc0: 4-bit, sd high-speed, mmc high-speed, dma
pchb2 at pci0 dev 24 function 0 "AMD AMD64 16h Link Cfg" rev 0x00
pchb3 at pci0 dev 24 function 1 "AMD AMD64 16h Address Map" rev 0x00
pchb4 at pci0 dev 24 function 2 "AMD AMD64 16h DRAM Cfg" rev 0x00
pchb5 at pci0 dev 24 function 3 "AMD AMD64 16h Misc Cfg" rev 0x00
pchb6 at pci0 dev 24 function 4 "AMD AMD64 16h CPU Power" rev 0x00
pchb7 at pci0 dev 24 function 5 "AMD AMD64 16h Misc Cfg" rev 0x00
isa0 at mainbus0
com0 at isa0 port 0x3f8/8 irq 4: ns16550a, 16 byte fifo
com0: console
com1 at isa0 port 0x2f8/8 irq 3: ns16550a, 16 byte fifo
com2 at isa0 port 0x3e8/8 irq 5: ns16550a, 16 byte fifo
umass0 at uhub0 port 3 configuration 1 interface 0 "Forza Motorsport 3" rev 2.00/2.00 addr 2
umass0: using SCSI over Bulk-Only
scsibus1 at umass0: 2 targets, initiator 0
sd1 at scsibus1 targ 1 lun 0: <Forza, Motorsport 3, 8.02> SCSI0 0/direct removable serial.07815560411194931C2A
sd1: 1927MB, 512 bytes/sector, 3948543 sectors
uhub2 at uhub1 port 1 configuration 1 interface 0 "vendor 0x0438 product 0x7900" rev 2.00/0.18 addr 2
softraid0 at root
scsibus2 at softraid0: 256 targets
root on rd0a swap on rd0b dump on rd0b
erase ^?, werase ^W, kill ^U, intr ^C, status ^T

Welcome to the OpenBSD/amd64 6.4 installation program.
(I)nstall, (U)pgrade, (A)utoinstall or (S)hell?
Press i and then press enter.
At any prompt except password prompts you can escape to a shell by
typing '!'. Default answers are shown in []'s and are selected by
pressing RETURN.  You can exit this program at any time by pressing
Control-C, but this can leave your system in an inconsistent state.

Terminal type? [vt220]
Accept default.
System hostname? (short form, e.g. 'foo') apu2c4
I use apu2c4.
Next, it will prompt for network configuration. Accept defaults.
Available network interfaces are: em0 em1 em2 vlan0.
Which network interface do you wish to configure? (or 'done') [em0]
IPv4 address for em0? (or 'dhcp' or 'none') [dhcp]
em0: no link.... got link
em0: bound to 192.168.86.115 from 192.168.86.1 (11:22:33:44:55:66)
IPv6 address for em0? (or 'autoconf' or 'none') [none]
Available network interfaces are: em0 em1 em2 vlan0.
Which network interface do you wish to configure? (or 'done') [done]
Using DNS domainname lan
Using DNS nameservers at 192.168.86.1
Next is the password for root account:
Password for root account? (will not echo)
Password for root account? (again)
Accept defaults to next several options.
Start sshd(8) by default? [yes]
Change the default console to com0? [yes]
Available speeds are: 9600 19200 38400 57600 115200.
Which speed should com0 use? (or 'done') [115200]
Next you’re asked to create a local user id:
Setup a user? (enter a lower-case loginname, or 'no') [no] bob
Full name for user bob? [bob]
Password for user bob? (will not echo)
Password for user bob? (again)
Next, accept default.
WARNING: root is targeted by password guessing attacks, pubkeys are safer.
Allow root ssh login? (yes, no, prohibit-password) [no]
What timezone are you in? ('?' for list) [America/Toronto]
Next, you’ll be prompted where do you want to install files.
Available disks are: sd0 sd1.
Which disk is the root disk? ('?' for details) [sd0]
Accept default.
Disk: sd0       geometry: 14593/255/63 [234441648 Sectors]
Offset: 0       Signature: 0xAA55
            Starting         Ending         LBA Info:
 #: id      C   H   S -      C   H   S [       start:        size ]
-------------------------------------------------------------------------------
 0: 00      0   0   0 -      0   0   0 [           0:           0 ] unused
 1: 00      0   0   0 -      0   0   0 [           0:           0 ] unused
 2: 00      0   0   0 -      0   0   0 [           0:           0 ] unused
*3: A6      0   1   2 -  14592 254  63 [          64:   234436481 ] OpenBSD
Now we need to partition selected disk. Type in w for Whole disk MBR:
Use (W)hole disk MBR, whole disk (G)PT, (O)penBSD area or (E)dit? [OpenBSD] w
Setting OpenBSD MBR partition to whole sd0...done.
The auto-allocated layout for sd0 is:
#                size           offset  fstype [fsize bsize   cpg]
  a:             1.0G               64  4.2BSD   2048 16384     1 # /
  b:             4.2G          2097216    swap
  c:           111.8G                0  unused
  d:             4.0G         10941664  4.2BSD   2048 16384     1 # /tmp
  e:            11.9G         19330272  4.2BSD   2048 16384     1 # /var
  f:             2.0G         44359200  4.2BSD   2048 16384     1 # /usr
  g:             1.0G         48553504  4.2BSD   2048 16384     1 # /usr/X11R6
  h:            16.3G         50650656  4.2BSD   2048 16384     1 # /usr/local
  i:             2.0G         84785344  4.2BSD   2048 16384     1 # /usr/src
  j:             6.0G         88979648  4.2BSD   2048 16384     1 # /usr/obj
  k:            63.4G        101562560  4.2BSD   2048 16384     1 # /home
Next we need to choose the file system layout. Type in a for Auto:
Use (A)uto layout, (E)dit auto layout, or create (C)ustom layout? [a]
Installer will partition disk and then prompt you if you want to partition another.
Accept default for done.
/dev/rsd0a: 1024.0MB in 2097152 sectors of 512 bytes
6 cylinder groups of 202.47MB, 12958 blocks, 25984 inodes each
/dev/rsd0k: 64879.9MB in 132873984 sectors of 512 bytes
321 cylinder groups of 202.47MB, 12958 blocks, 25984 inodes each
/dev/rsd0d: 4096.0MB in 8388608 sectors of 512 bytes
21 cylinder groups of 202.47MB, 12958 blocks, 25984 inodes each
/dev/rsd0f: 2048.0MB in 4194304 sectors of 512 bytes
11 cylinder groups of 202.47MB, 12958 blocks, 25984 inodes each
/dev/rsd0g: 1024.0MB in 2097152 sectors of 512 bytes
6 cylinder groups of 202.47MB, 12958 blocks, 25984 inodes each
/dev/rsd0h: 16667.3MB in 34134688 sectors of 512 bytes
83 cylinder groups of 202.47MB, 12958 blocks, 25984 inodes each
/dev/rsd0j: 6144.0MB in 12582912 sectors of 512 bytes
31 cylinder groups of 202.47MB, 12958 blocks, 25984 inodes each
/dev/rsd0i: 2048.0MB in 4194304 sectors of 512 bytes
11 cylinder groups of 202.47MB, 12958 blocks, 25984 inodes each
/dev/rsd0e: 12221.2MB in 25028928 sectors of 512 bytes
61 cylinder groups of 202.47MB, 12958 blocks, 25984 inodes each
Available disks are: sd1.
Which disk do you wish to initialize? (or 'done') [done]
Now installer is going to prompt you for the source of installation files.
By default it is http, but since we didn’t connect apu2c4 to network yet,
type disk and enter instead.
Let's install the sets!
Location of sets? (disk http or 'done') [http] disk
In next prompt type no and enter.
Is the disk partition already mounted? [yes] no
Available disks are: sd0 sd1.
In next prompt, accept default sd1.
Which disk contains the install media? (or 'done') [sd1] sd1
  a:           736256             1024  4.2BSD   2048 16384 16142
  i:              960               64   MSDOS
Available sd1 partitions are: a i.
Next, accept default a.
Which sd1 partition has the install sets? (or 'done') [a]
Next, press enter twice to accept defaults.
Pathname to the sets? (or 'done') [6.4/amd64]

Select sets by entering a set name, a file name pattern or 'all'. De-select
sets by prepending a '-', e.g.: '-game*'. Selected sets are labelled '[X]'.
    [X] bsd           [X] base64.tgz    [X] game64.tgz    [X] xfont64.tgz
    [X] bsd.mp        [X] comp64.tgz    [X] xbase64.tgz   [X] xserv64.tgz
    [X] bsd.rd        [X] man64.tgz     [X] xshare64.tgz
Set name(s)? (or 'abort' or 'done') [done]
Next, you’re prompted about lack of signature. Type in yes.
Directory does not contain SHA256.sig. Continue without verification? [no] yes
Installing bsd          100% |**************************| 14987 KB    00:00
Installing bsd.mp       100% |**************************| 15086 KB    00:00
Installing bsd.rd       100% |**************************|  9782 KB    00:00
Installing base64.tgz   100% |**************************|   157 MB    00:19
Extracting etc.tgz      100% |**************************|   259 KB    00:00
Installing comp64.tgz   100% |**************************| 64081 KB    00:11
Installing man64.tgz    100% |**************************|  7086 KB    00:01
Installing game64.tgz   100% |**************************|  2742 KB    00:00
Installing xbase64.tgz  100% |**************************| 19287 KB    00:03
Extracting xetc.tgz     100% |**************************|  6963       00:00
Installing xshare64.tgz 100% |**************************|  4432 KB    00:01
Installing xfont64.tgz  100% |**************************| 39342 KB    00:04
Installing xserv64.tgz  100% |**************************| 13355 KB    00:01
Accept default done.
Location of sets? (disk http or 'done') [done]
Saving configuration files... done.
Making all device nodes... done.
Multiprocessor machine; using bsd.mp instead of bsd.
Relinking to create unique kernel... done.

CONGRATULATIONS! Your OpenBSD install has been successfully completed!

When you login to your new system the first time, please read your mail
using the 'mail' command.
Remove USB stick and press enter to reboot.
Exit to (S)hell, (H)alt or (R)eboot? [reboot]
syncing disks... done
rebooting...
Now you can boot to installed OpenBSD.
Install vim and fix pseudo graphics
Install vim. I chose version with Python3 support.
# pkg_add vim
quirks-3.16 signed on 2018-10-12T15:26:25Z
Ambiguous: choose package for vim
a       0: <None>
        1: vim-8.1.0438-gtk2
        2: vim-8.1.0438-gtk2-lua
        3: vim-8.1.0438-gtk2-perl-python-ruby
        4: vim-8.1.0438-gtk2-perl-python3-ruby
        5: vim-8.1.0438-no_x11
        6: vim-8.1.0438-no_x11-lua
        7: vim-8.1.0438-no_x11-perl-python-ruby
        8: vim-8.1.0438-no_x11-perl-python3-ruby
        9: vim-8.1.0438-no_x11-python
        10: vim-8.1.0438-no_x11-python3
        11: vim-8.1.0438-no_x11-ruby
Your choice: 10
vim-8.1.0438-no_x11-python3: ok
To fix pseudographics and replace vi with vim, edit .profile and add:
LC_CTYPE=en_EN.UTF-8
alias vi="vim"
Update OpenBSD
Patch the kernel with syspatch
Use syspatch -l to list currently installed patches. For fresh install it’s empty.
Use syspatch -c to list pending updates:
# syspatch -c
001_xserver
002_syspatch
003_portsmash
004_lockf
005_perl
006_uipc
007_smtpd
008_qcow2
009_recvwait
010_pcbopts
011_mincore
012_nfs
013_unveil
014_pf6frag
015_pficmp
016_vmmints
To install updates, use syspatch:
Get/Verify syspatch64-001_xserver... 100% |*************|  1227 KB    00:00
Installing patch 001_xserver
Get/Verify syspatch64-002_syspatc... 100% |*************|  4627       00:00
Installing patch 002_syspatch
syspatch updated itself, run it again to install missing patches
Get/Verify syspatch64-003_portsma... 100% |*************| 15264 KB    00:02
Installing patch 003_portsmash
Get/Verify syspatch64-004_lockf.tgz 100% |**************|   658 KB    00:00
Installing patch 004_lockf
Get/Verify syspatch64-005_perl.tgz 100% |***************|  5319 KB    00:00
Installing patch 005_perl
Get/Verify syspatch64-006_uipc.tgz 100% |***************|   176 KB    00:00
Installing patch 006_uipc
Get/Verify syspatch64-007_smtpd.tgz 100% |**************|  6484       00:00
Installing patch 007_smtpd
Get/Verify syspatch64-008_qcow2.tgz 100% |**************| 95855       00:00
Installing patch 008_qcow2
Get/Verify syspatch64-009_recvwai... 100% |*************|   101 KB    00:00
Installing patch 009_recvwait
Get/Verify syspatch64-010_pcbopts... 100% |*************|   108 KB    00:00
Installing patch 010_pcbopts
Get/Verify syspatch64-011_mincore... 100% |*************| 83488       00:00
Installing patch 011_mincore
Get/Verify syspatch64-012_nfs.tgz 100% |****************|   318 KB    00:00
Installing patch 012_nfs
Get/Verify syspatch64-013_unveil.tgz 100% |*************|   213 KB    00:00
Installing patch 013_unveil
Get/Verify syspatch64-014_pf6frag... 100% |*************|   101 KB    00:00
Installing patch 014_pf6frag
Relinking to create unique kernel... done.
Notice “syspatch updated itself, run it again to install missing patches” and run syspatch again.
It doesn’t have any additional updates. Restart shutdown -r now.
After the restart, if you type in uname -a, you’ll get:
OpenBSD apu2c4.lan 6.4 GENERIC.MP#9 amd64
Before patching kernel, it had a different number after hash.
Update binary packages
Use pkg_add -Uuv command.
If you installed packages recently, you’ll see lots of candidates, but nothing will actually get updated.
If you run your OpenBSD box for a while, it may have some package updates.
apu2c4# pkg_add -Uuv
Update candidates: quirks-3.16 -> quirks-3.16
quirks-3.16 signed on 2018-10-12T15:26:25Z
Update candidates: bzip2-1.0.6p9 -> bzip2-1.0.6p9
Update candidates: gettext-0.19.8.1p1 -> gettext-0.19.8.1p1
Update candidates: libffi-3.2.1p4 -> libffi-3.2.1p4
Update candidates: libiconv-1.14p3 -> libiconv-1.14p3
Update candidates: python-3.6.6p1 -> python-3.6.6p1
Update candidates: sqlite3-3.24.0p0 -> sqlite3-3.24.0p0
Update candidates: vim-8.1.0438-no_x11-python3 -> vim-8.1.0438-no_x11-python3
Update candidates: xz-5.2.4 -> xz-5.2.4
Configure OpenBSD as a router
I’ll use this great example as a reference.
Enable routing:
echo 'net.inet.ip.forwarding=1' >> /etc/sysctl.conf
Configure WAN port em0 to use DHCP:
echo 'dhcp' > /etc/hostname.em0
Set up LAN port em1 to use IPv4 address 192.168.1.1:
echo 'inet 192.168.1.1 255.255.255.0 192.168.1.255' > /etc/hostname.em1
Set up LAN port em2 to use IPv4 address 192.168.2.1:
echo 'inet 192.168.2.1 255.255.255.0 192.168.2.255' > /etc/hostname.em2
Enable and configure DHCP:
rcctl enable dhcpd
rcctl set dhcpd flags em1 em2
Edit /etc/dhcpd.conf:
subnet 192.168.1.0 netmask 255.255.255.0 {
	option routers 192.168.1.1;
	option domain-name-servers 192.168.1.1;
	range 192.168.1.10 192.168.1.254;
	host myserver {
		fixed-address 192.168.1.2;
		hardware ethernet 00:00:00:00:00:00;
	}
}
subnet 192.168.2.0 netmask 255.255.255.0 {
	option routers 192.168.2.1;
	option domain-name-servers 192.168.2.1;
	range 192.168.2.10 192.168.2.254;
}
Edit /etc/pf.conf:
wired = "em1 em2"
table <martians> { 0.0.0.0/8 10.0.0.0/8 127.0.0.0/8 169.254.0.0/16     \
	 	   172.16.0.0/12 192.0.0.0/24 192.0.2.0/24 224.0.0.0/3 \
	 	   192.168.0.0/16 198.18.0.0/15 198.51.100.0/24        \
	 	   203.0.113.0/24 }
set block-policy drop
set loginterface egress
set skip on lo0
match in all scrub (no-df random-id max-mss 1440)
match out on egress inet from !(egress:network) to any nat-to (egress:0)
antispoof quick for { egress $wired }
block in quick on egress from <martians> to any
block return out quick on egress from any to <martians>
block all
pass out quick inet
pass in on { $wired } inet
pass in on egress inet proto tcp from any to (egress) port { 80 443 } rdr-to 192.168.1.2
Next, enable and configure DNS server:
rcctl enable unbound
Edit /var/unbound/etc/unbound.conf:
server:
	interface: 192.168.1.1
	interface: 192.168.2.1
	interface: 127.0.0.1
	access-control: 192.168.1.0/24 allow
	access-control: 192.168.2.0/24 allow
	do-not-query-localhost: no
	hide-identity: yes
	hide-version: yes

forward-zone:
        name: "."
        forward-addr: 1.1.1.1  # IP of the upstream resolver
To test, I’ll plug a normal network cable into em0 (nearest to serial port) and a PC into em1 or em2.
Configure automatic time synchronization
rcctl enable ntpd
rcctl start ntpd
rcctl ls started
Add packages
pkg_add gmake bison mc git go
Search for packages
Use pkg_info -Q <key word>:
# pkg_info -Q python3
bpython3-0.17.1p0
diveintopython3-20130531
ipython3-5.3.0p0
Install and configure ddclient
I want to get dynamic DNS working with my domain at Namecheap, so I need to get ddclient on my apu2c4. Fortunately it seems OpenBSD comes with ddclient prepackaged:
apu2c4$ pkg_info -Q ddclient
ddclient-3.8.3p1
To install, use pkg_add ddclient:
# pkg_add ddclient
quirks-3.16 signed on 2018-10-12T15:26:25Z
ddclient-3.8.3p1:p5-Net-SSLeay-1.85: ok
ddclient-3.8.3p1:p5-IO-Socket-SSL-2.060: ok
ddclient-3.8.3p1:p5-Digest-SHA1-2.13p4: ok
ddclient-3.8.3p1: ok
The following new rcscripts were installed: /etc/rc.d/ddclient
See rcctl(8) for details.
Let us also enable autostarting for ddclient:
# rcctl enable ddclient
# rcctl start ddclient
ddclient(ok)
# rcctl ls started
cron
ddclient
ntpd
pflogd
slaacd
smtpd
sndiod
sshd
syslogd
Next, update /etc/ddclient/ddclient.conf by uncommenting relevant section (NameCheap for me) and filling in the details. Don’t use NameCheap account password. Once you create A+Dynamic record and enable Dynamic DNS, you’ll get a generated password. Use that in ddclient.conf.